Ask the Expert: The Ins and Outs of Building a Gallery Wall

Gallery walls are popping up all over on social media, designer websites, and magazines. What makes them so popular? And how do you put one together? At the gallery, we’re often asked about creating gallery walls and the process behind it. While there are no specific rules for creating a gallery wall of your own, there are some guidelines that we follow here at the gallery. Below, we will explore the process of creating a gallery wall, as well as some tips you may find helpful along the way.
1. What’s the best way to begin? We recommend building a gallery wall around one central piece of art, preferably an artwork you really love. This piece probably will be the largest in the group, but it does not have to be. This artwork will set the tone and tie the gallery wall together. So, it will likely have similarities to most, if not all, of the work on the wall. As a general rule, this piece will be placed in a prominent spot, preferably slightly off-center.
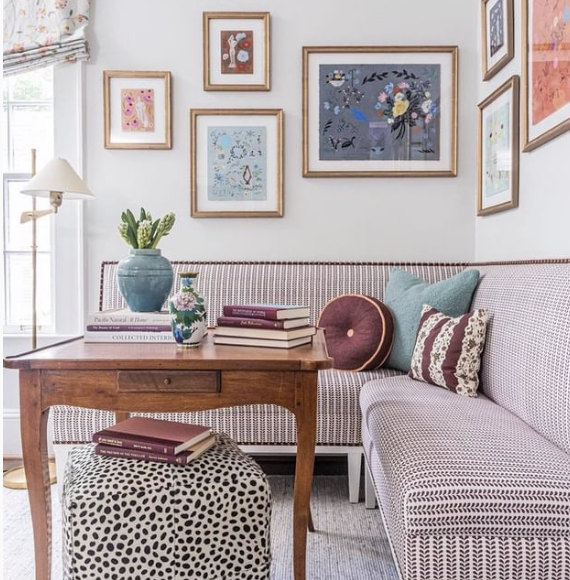
2. What type of art should be used? While there are a number of options, we suggest including pieces that are a variety of different sizes and styles. For example, in the image as the top of this post, the gallery wall includes pieces ranging from fully representational to transitional (with both abstract and representational qualities) to entirely abstract. Despite their differences, however, the various artworks all interact with each other well via similarities or contrasts in color, subject, or pattern.
Similarly, a number of different sizes and shapes are included, Here, you see both vertical and horizontal pieces mixed with squares. In addition, this example includes a number of media (canvas and framed works on paper), which can also add interesting contrast. Photographs, wall sculptures, and ceramic pieces fit in nicely as well.
While the gallery wall above uses a variety of colors, media, sizes and shapes to form an interesting composition, a beautiful gallery wall can also be composed by holding one or more of these elements constant. So, it may be a wall of all photographs, or all pieces might be framed in black, for example. Again, there are no rules!

3. Implementation: In putting a gallery wall together, we’d advise readers to try different combinations out before hanging the wall. Lay the artworks out on the floor and move them around until you are satisfied with way the various pieces interact with each other. Play with the spacing between pieces, and experiment with centered vs. off center arrangements. Once you are satisfied, take a photo of your layout for reference. Draw a schematic and write down the distance between each piece. Alternatively, trace the outline of your artworks on large pieces of paper and move them around to create a pleasing arrangement.
In terms of placement on the wall, a general rule of thumb is that the center of the arrangement should be 6 feet from the floor.
4. Framing. Regarding framing options for different pieces in your gallery wall, we previously wrote a blog post outlining some options, which you can find here. But this is also an opportunity to let your creativity show. Fun, unique, colorful frames are a great way to let your personality shine! When framing works on paper, white matting can provide some breathing space between artworks, as well as add stature to smaller works. Not every artwork needs to be framed, however, unless uniformity is the look you are going for.
5. Other Tips: Make sure that your composition is balanced. In the image above, we have our principal piece, the painting with the yellow flower, in the middle with 3 paintings on the left and 4 on the right, with similarly large and small works. This gives the gallery wall a balanced feeling with near-equal weight on both sides. Similarly, the wall is balanced with both abstract and representational works spread throughout the wall, which keeps the viewers eye moving between the pieces.
In the gallery wall design, be mindful of spacing everything about the same distance apart; in doing so, the flow of the gallery wall will continue unimpeded. We have found that somewhere around 2 or 3 inches is best, but this can be adjusted based on the type of wall you’re looking to create and what pieces you’re intending to use.
So, what makes a great gallery wall? An artful combination of pieces you love, and a little bit of creativity!